HELM
Introduction
In simple terms, Helm is a package manager for Kubernetes. Helm is the K8s equivalent of yum or apt. Helm deploys charts, which you can think of as a packaged application. It is a collection of all your versioned, pre-configured application resources which can be deployed as one unit.
Helm help us in following ways:
1) Improves Productivity. 2) Reduce the complexity of deployments of microservices. 3) Enables the adaption of cloud native applications.
Why do we need Helm?
currently, you would be deploying your applications via Kubectl, but there are two limitation with it:
1) Packaging 2) Versioning
Packaging: While we are creating our deployments over kubernetes (k8s), we have to take care of multiple k8s resources, we’ll have to deploy a configMap, a secret, if involved, deployment, service, and an ingress. we have to create each K8s resources individually. Also, maintaining all those k8s resources will be a difficult task.
Helm eliminate this limitation by keeping all the K8s resources of every application or mircoservices in a separate package known as helm package and in order to deploy all the resource we have to use one commad i.e "Helm install"
Versioning: kubectl don't provide any way for maintaining application versions. Using kubectl, we can individually maintain versions for the K8s objects, but not for the application. Helm eliminates this limitation by maintaining the version for the whole chart. This also helps in upgrading and rolling back the application in an easy way.
Helm Architecture
1) Helm Client
- Helm Client is the command line tool for end users.
- Responsible for chat deployments.
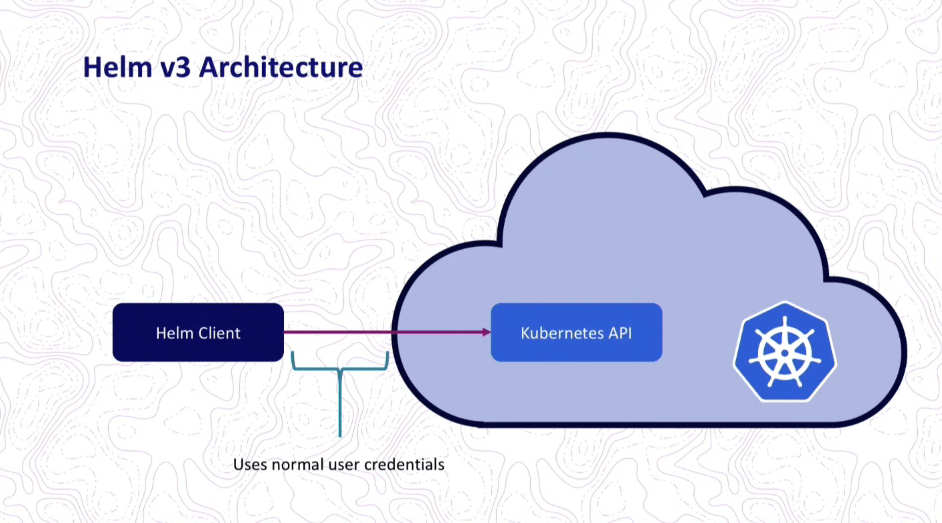
- Interact with the server side component Tiller till Helm v2, The most important change in Helm v3 is the removal of Tiller.
2) Tiller
- The Tiller Server is an in-cluster server that interacts with the Helm client
- Listening for incoming requests from the Helm client.
- Installing charts into Kubernetes, and tracking the subsequent release.
Helm 3 Architecture
Helm Components
Three main type of Helm Components are:
1) Chart: A package of pre-configured Kubernetes resources. 2) Release: A specific instance of a chart which has been deployed to the cluster using Helm. 3) Repository: A group of published charts which can be made available to others.
Helm Directory Structure
YOUR-CHART-NAME/
|- .helmignore
|- Chart.yaml
|- values.yaml
|- charts/
|- templates/
- .helmignore - This holds all the files to ignore when packaging the chart. Similar to .gitignore, if you are familiar with git.
- Chart.yaml - meta info about chart.
- values.yaml - values for the template files like variables.
- charts/ - directory for chart dependencies.
- templates/ - the actual template files where you put the actual manifest you are deploying with the chart
Common actions for Helm
- helm search: search for charts
- helm pull: download a chart to your local directory to view
- helm install: upload the chart to Kubernetes
- helm list: list releases of charts
Benefits of Helm
Boosts productivity: Using Helm allows software to deploy their test environments at the click of a button.
Reduces duplication & complexity: Once the chart is built once, it can be used over and over again and by anyone. The fact that you can use the same chart for any environment reduces complexity of creating something for dev, test and prod.
Smooths the K8S learning curve: It’s no secret that the learning curve for Kubernetes and containers is long for your average developer. Helm simplifies that learning curve: developers do not require a full, detailed understanding of the function of each Kubernetes object in order to start developing and deploying container applications.
Simplifies deployments: Helm Charts make it easy to set overridable defaults in the values.yaml file, allowing software vendors or administrators of charts to define a base setting. Developers and users of charts can override these settings when installing their chart to suit their needs. If the default installation is required, then no override is required.
Additional resources:
- K8S docs: https://kubernetes.io/
- How to Install Helm: https://helm.sh/docs/intro/install/
- Helm Overview: https://youtu.be/-ykwb1d0DXU